|
Twelve Steps to a Quality Restoration

• Proper Preparation


click on pictures for larger view
In order for the piano restoration to
progress smoothly, it is important to note the anticipated repairs,
loose veneer, and placement of the hardware, felts, leathers, and
buttons before tearing down the piano. If there are cracks in the
lid, they should be noted and scored with a fine saw, as once stripped,
they might not be seen until a finish is applied. The cracks will
need shims glued into them to reduce the chance of the crack to
re-appear. Labeling the hardware will ensure the piano goes back
together smoothly. Noting these details will ensure the completed job
will look like the original maker intended.
•
Proper Protection


click on pictures for larger view
It is imperative that the musical parts of
the piano be protected while refinishing. The plate, strings,
soundboard, key bed, and underside of the piano can not be subjected to
removers, solvents, or finish overspray. The action is removed and
put in a safe place. The plate and strings are protected with multiple
layers of paper and cardboard.
• Thorough finish removal


click on pictures for larger view
The parts are stripped with liquid remover
through a flow-over process. The case of the piano is stripped by
hand with semi paste remover. Once the finish is removed, all parts are solvent washed to ensure the boards are absolutely clean.
• Accurate cabinet and veneer repair


click on pictures for larger view
Proper cabinet repairs are a must for a
quality restoration. All loose veneer and cabinet damage are
meticulously repaired before parts are sanded and readied for colorants
and the finish.
• Quality wood colorants


click on pictures for larger view
Colorants are selected to enhance the
natural qualities of the wood and to make the parts uniform in color
without obscuring the beauty of the wood. Dyes are often the best
choice for the base colorant. Often additional grain is added to make
different woods blend a little more then just a good color match. To add
depth or warmth, a glaze might be used between coats.
• Properly filled wood pores


click on pictures for larger view
All open grained parts are paste filled to
provide a stable base for topcoats. Paste filler is a far better
material to fill the pores of wood compared to building sealers or
lacquer in the pores. A properly filled board will accept topcoats
without absorbing too much finishing material.
• Quality sealers and topcoats


click on pictures for larger view
I prefer a de-waxed shellac as a sealer.
This product provides a great base for building the lacquer topcoats.
Shellac provides an excellent barrier for contaminants that might be in
the wood from old furniture polishes. It also has excellent
adhesion qualities you ensure the finish is well bonded to the wood.
•
Clear color balances


click on pictures for larger view
Occasionally, the color of the wood needs
adjustment for blending the differences in parts. Shading lacquers
with dye are used for minor changes. Pigmented glazes are used to
highlight pieces and add a warm look.
•Patient finish building


click on pictures for larger view
Multiple coats of lacquer are applied and
sanded between every other coat with 320 grit finishing paper. The
sanding is progressive and gets more thorough as the finish is built up.
This keeps the coating from being too thick, yet allows for the built to
be smooth and level. Ample drying time between coats is important
to allow the finish to shrink into the grain of the wood and let the
solvents evaporate. Between coats, a replica decal is applied to the
fallboard and any necessary touch up colorants are applied.
•
Adequate drying and curing


click on pictures for larger view
Once ample coats of lacquer are applied,
the finish is left to cure for at least a week, usually two weeks.
This allows the coating to shrink and cure while allowing the remaining
solvents in the finish to evaporate.
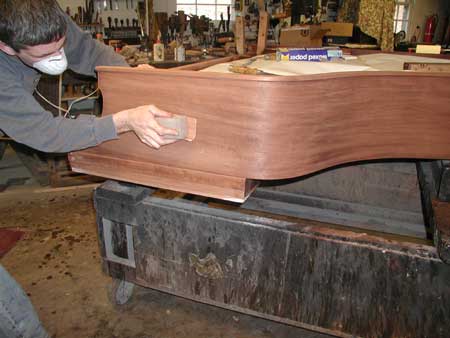
• Rubbing and polishing the finish


click on pictures for larger view
Traditionally, finishes were rubbed and
polished to satin or semi gloss sheens. I use the same approach to
achieve the look the maker intended the piece to have. After
cutting the surface with 600- 800 grit finishing paper, I rub with
multiple grits of steel wool, rubbing compounds and lubricant to achieve
the finest look in cabinet finishing.
• Assembly, hardware restoration, and
detailing


click on pictures for larger view
In order to replicate what the maker
intended, the detailing that went into the making of a piano originally,
needs to be reproduced. On Steinways, for example, leather buttons
were used where boards contacted each other. Under the lid, there are
leather pads that prevent the finished surfaces from getting scarred
when the lid is closed. These details are just part of what is
applied to the piano as it is re-assembled.
On many traditional pianos the brass
hardware was polished to a satin or brushed sheen. This look goes
well with the qualities of a formal rubbed finish. The brass
hardware is cleaned and polished to this satin sheen before having a
tarnish resistant lacquer applied.
The felts are replaced on the fallboard,
lid lock board and anywhere wood parts are attached to each other. The
music desk guide is lined with bushing cloth which will wear well for
many years. Bellymen felt is replaced where the plate contacts the
stretcher.
Finally, the underside of the piano is
cleaned and sealed before delivery. When the piano is delivered
from my shop, the restoration is completely done. The back and
undersides of all parts are cleaned and finished. The finish is cured,
the plate, action, strings, and soundboard have all been protected to
ensure the piano not only looks wonderful, it will sound and play well
too. There is not a detail that is forgotten.
Back
to Top of Page
Home
Copyright by Kevin E.
Hancock, Inc. 2005-2018 all rights reserved
|